
PENpal Support
Below is a directory for answers to frequently asked PENpal questions. Click on the directory below to jump to that section.
QUICK START GUIDE
How do I start using my PENpal?
PENpal Audio Recorder Pen is ready to use in 3 easy steps: 1. Press the POWER button 2. Touch the START arrow in PENpal-enabled books and posters 3. Touch the top corner of the pages to activate sound. Easily switch between languages by touching the language circles on the cover. Want to add more books to your PENpal? Download free audio files from your PC or MAC with FreeLINK.
What are the buttons on my PENpal?
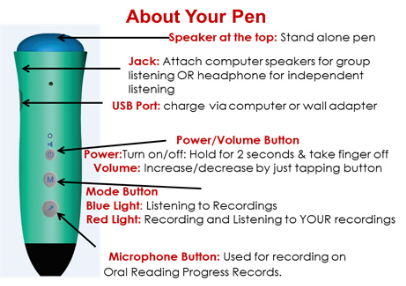
For a video tour of your PENpal (buttons, USB port, etc.), watch this video.
How do I touch the page to hear the sound?
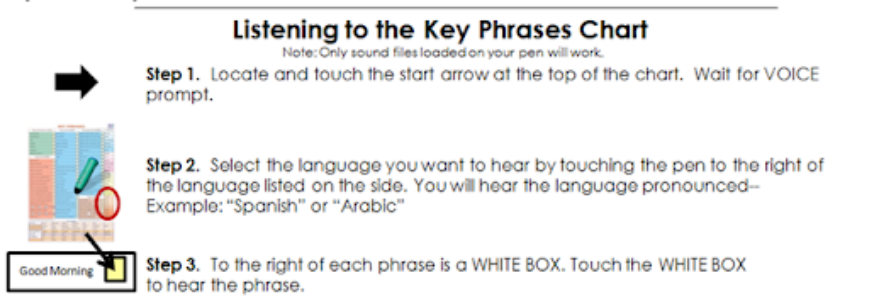
The PENpal must touch the top corners of the page of a book to activate the audio. You do not need to press hard nor run the pen across the words. For the Key Phrases chart, touch the white box next to the phrase to hear it in the selected language. Watch this video to see how to touch the page and activate sound.
How do I switch between languages?
Watch this video to see how to touch the symbols on the front cover of your PENpal-enabled books to start your PENpal and switch between languages.
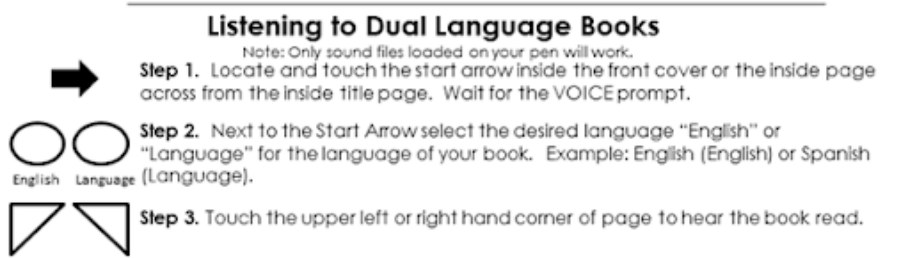
How do I listen to my Bilingual Books?
How do I listen to my Key Phrases Chart?
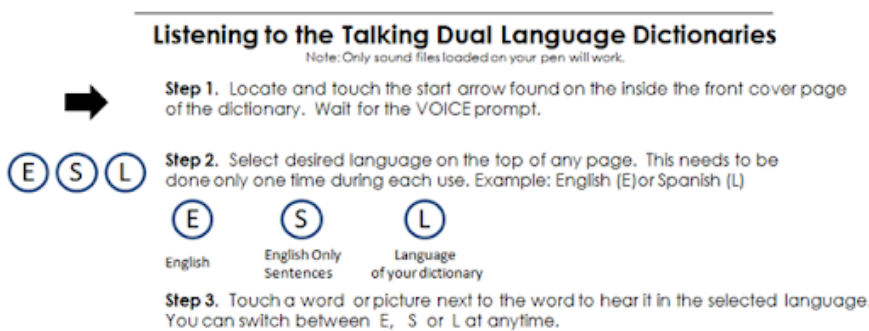
How do I listen to my Bilingual Talking Dictionaries?
FREELINK AUDIO FILES FOR THE PENPAL
How do I download audio files to add more books to my PENpal?
Please visit the FreeLINK Audio Files page to see a step-by-step guide to update your PENpal with the FreeLINK audio files. Here you will find download instructions for PC users and Mac users. HOW TO USE RECORDING LABELS
How can I use recording labels in my classroom?
There are so many creative ways to use your PENpals recording function and recording labels! Watch an overview of PENpal and how to use recording labels to foster language learning in your classroom: Click here to see sample lesson plans and classroom activities you can use with your PENpals recording labels.
How long can I record on a label?
1 hour per label. You can re-record on each label too. Just follow the recording steps again. There is no erasing required.
How can I purchase more recording labels?
Recording labels are available for purchase here.
My PENpal is not playing my recording. What should I do?
Option 1. Ensure that you are using the same PENpal that you used to make the recording. You are actually making an audio file on the PENpal, which is why you need to use the same pen. Option 2. Ensure that you have changed the PENpal to the "RECORDING MODE/ RED LIGHT MODE" by holding down the button for 2 seconds. The mode button allows you to switch between PRINT mode, which plays the preloaded sound files, and the RECORDING mode, which allows you to Record and Play back the sound files you create using the recordable labels. Option 3. Turn the PENpal off by holding the Power button down for 2 seconds until the light turns off. Then turn the PENpal back on and put it in the "RECORDING MODE/ RED LIGHT MODE." If this does not work, take out one of the batteries, wait for five seconds, and insert them again. Turn the pen back on and put it in the "RECORDING MODE/ RED LIGHT MODE."
How do I use the different types of recording label sets?
a. Colorful Student Set b. White Student Set c. Teacher Set
a. Student Set (with red circle, blue square, and green triangle)
When making your recordings with a Teacher Set of labels, follow the directions below and use the teacher's Control set of labels, which will prevent recordings from being erased by students.
LISTENING AND RECORDING
What type of headphone works with the PENpal?
Headphones with a 3.5 mm stereo mini jack. It is similar to those used with an iPod or MP3 player.
How do I increase/decrease the volume on the PENpal?
The power button doubles as a volume control button. After turning the pen on by holding the power button down for 2 seconds, you can adjust the volume by quickly clicking the power button. Every time it is clicked, the volume will be adjusted until it reaches a maximum level. Once it reaches its maximum level, the next click will adjust the volume to the minimum level and the cycle will repeat again.
What does it mean when my PENpal says, "Touch the start arrow to begin"?
Every sound-enabled publication has a printed arrow labeled "Start." For books, it is usually found on the inside front cover or the inside page directly across from the title page. The Start Arrow is used to tell the PENpal which book or chart it is reading. The Start Arrow activates the appropriate sound file that is already loaded onto the PENpal. If you do not have the sound file for a publication loaded on your PENpal, it will remain silent when you touch the Start Arrow.
What is the "M" button used for on the PENpal?
The "M" refers to the mode the PENpal is in. This button allows you to switch between PRINT mode, which plays the preloaded sound files, and the RECORDING mode, which allows you to Record and Play back the sound files you create on that pen using the Recordable Labels. HOURS OF USE, BATTERY CHARGING, TURNING YOUR PENPAL ON/OFF
How many hours of recordings does the PENpal hold?
280 hours.
How long should you charge the PENpal before the first use?
How do I charge (and recharge) my PENpal?
Option 1. You can charge your pen using the USB cable to connect the pen to a PC or Mac. The computer will charge the pen in a maximum of 1.5 hours. Option 2. You can also connect the cable to an AC Adapter and plug it into an outlet. The charging time is 1 hour if you connect to an outlet.
How long will PENpal stay charged?
Testing shows that a full charge allows you to touch a sound spot over and over again 50 times a minute for at least 3 hours before the batteries discharge. If you use headphones the batteries stay charged for a longer period because it is less of a drain on the batteries. If you do not use the PENpal for up to 10 days it will stay charged. However, we recommend giving it a booster charge for 45 minutes before use if it has been left unused for over 10 days
What's the life of the battery?
The AAA rechargeable batteries that come with the PENpal will recharge without deterioration approximately 500 times.
What type of batteries does the PENpal use?
The PENpal comes with 2 rechargeable AAA batteries. The batteries should be drained completely before recharging in order to extend battery life.
Can I use normal AAA batteries?
Your PENpal comes with 2 rechargeable AAA batteries. You can use normal AAA batteries but they will need to be replaced each time the batteries no longer function.
How do I know when the batteries are running low?
The PENpal will begin to respond slower as your batteries begin to run low. You will also hear an audio message stating "Batteries Low" when it's time to recharge the pen.
My PENpal does not turn on. Why?
Option 1. Ensure that your PENpal is charged. Option 2. Make sure that you hold the Power button down for about 2 seconds until the blue light comes on. Option 3. If the pen is fully charged, verify that the batteries are inserted the correct way. To remove your batteries, slide the silicone sleeve off the pen to remove the green back cover. You will need a micro-screwdriver to remove the small screw from the back cover. At the top of the cover there is a round notch that you can slide your finger in to lift the cover. Follow the + and - marking in the battery case when you re-insert the batteries. Put the silicone sleeve back on the pen. Make sure the sleeve is correctly aligned with the buttons on the pen. When the ports at the top of the pen are fully exposed, you should be able to see the blue light when you start the pen. If the sleeve placement is slightly off, you can shift the sleeve around until it is correctly aligned.
How do I turn off the PENpal?
Hold the Power button down for 2 seconds until the blue or red light turns off.
My PENpal won't turn off. What should I do?
Option 1. Ensure the silicone sleeve is correctly aligned with the yellow buttons located directly on the PENpal. If the sleeve placement is slightly off, you can adjust/shift the sleeve around until it is correctly aligned. When the ports at the top of the pen are fully exposed, you should be able to see the blue/red light. Option 2. Rarely, your pen may "freeze," which is the equivalent to your computer crashing. In this case you will simply need to take out one of the batteries, wait for five seconds, and insert it again to reboot your pen. ONLINE TUTORIAL & WARRANTY
Is there an online tutorial that accompanies the PENpal and materials?
Yes. In your PENpal kit, you will find a flyer that includes a link to an online tutorial course. Visit this resource.
What is the PENpal warranty?
There is a 1-year warranty against normal wear and tear. The specific warranty details are included with each PENpal. |